Common Moulded Praline Problems and Solutions
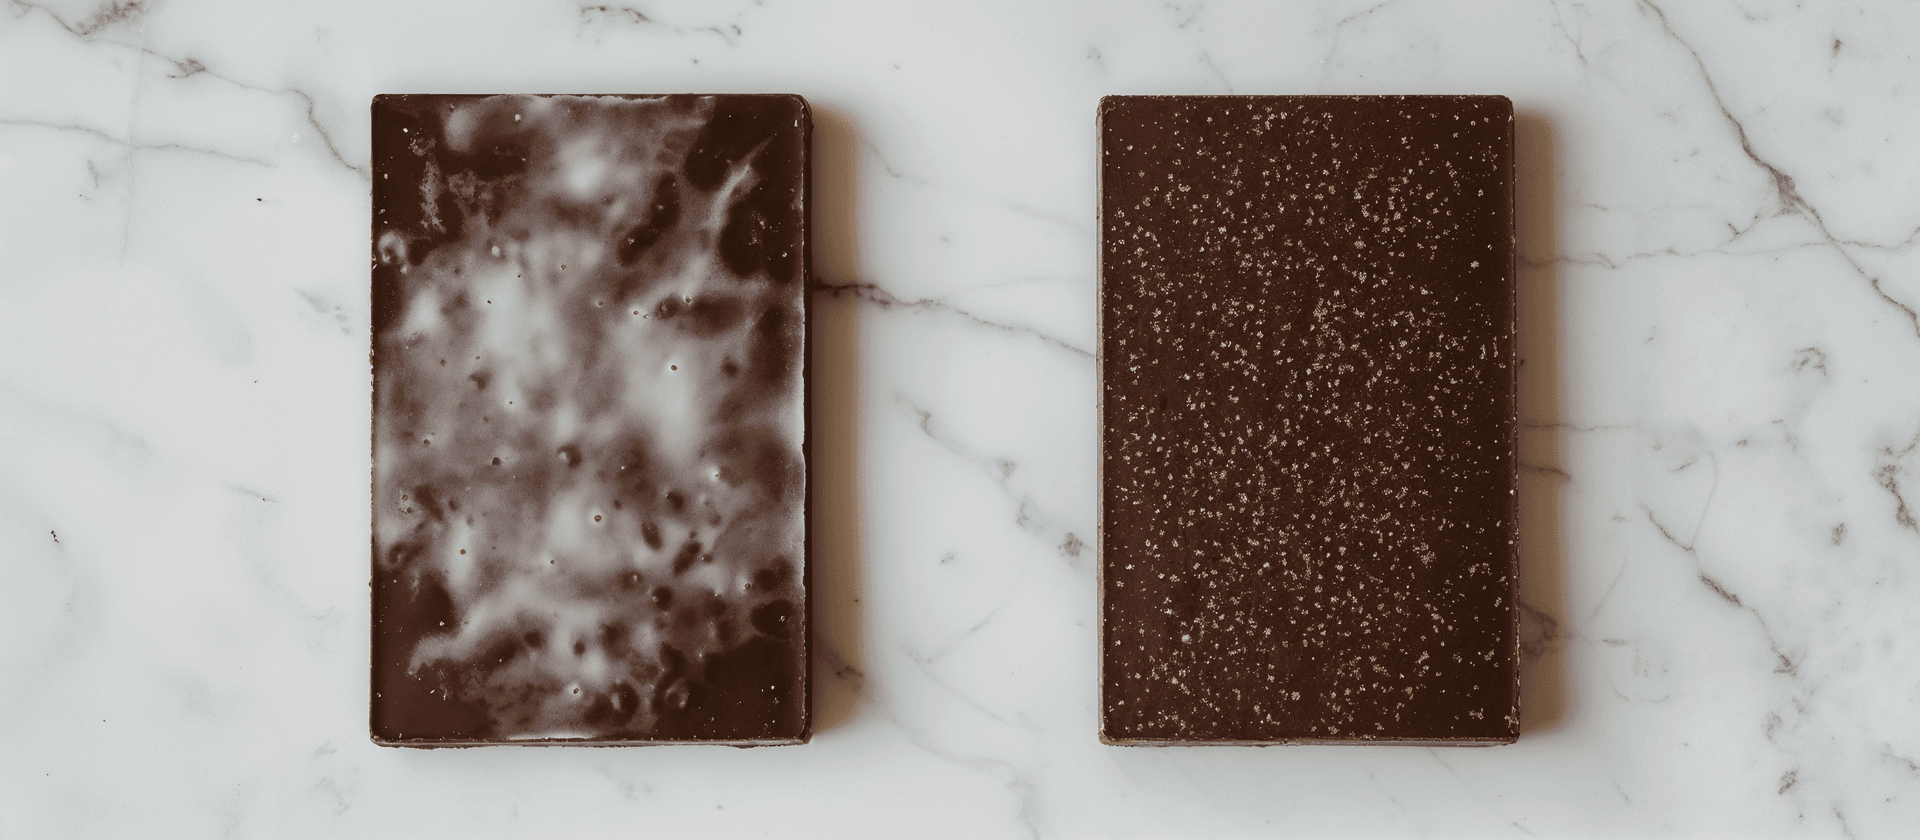
1. Dull Stains or Discolouration on Pralines
Achieving a glossy, vibrant finish is essential for premium moulded pralines, but dull spots, stains, or overall discolouration can undermine this, making your creations look lackluster and unprofessional. This issue is prevalent in chocolate work and can stem from various factors in the moulding process, but with careful attention to materials and techniques, it can be effectively resolved to restore that desirable shine.
Causes:
- Utilizing improper mould materials, such as non-polycarbonate types, or moulds that are contaminated with residue, which prevent the chocolate from achieving a mirror-like surface.
- Working with undercrystallised or poorly tempered chocolate, leading to uneven hardening and a matte appearance rather than the expected gloss.
- Subjecting the pralines to rapid cooling or environments with high humidity, which disrupts the uniform setting of the chocolate and causes discolouration.
- Applying overcrystallized chocolate for decorative elements, which can bleed into the overall finish and create inconsistent textures or colours.
Solutions:
- Opt for high-quality, clean polycarbonate moulds exclusively; if shine diminishes over time, polish them gently with a soft cloth to restore their reflective properties.
- Master precise tempering techniques to form stable beta crystals in the cocoa butter, ensuring a smooth, shiny exterior upon demoulding.
- Implement controlled cooling at temperatures between 15–18°C in a low-humidity setting to allow for gradual and even crystallization without stress.
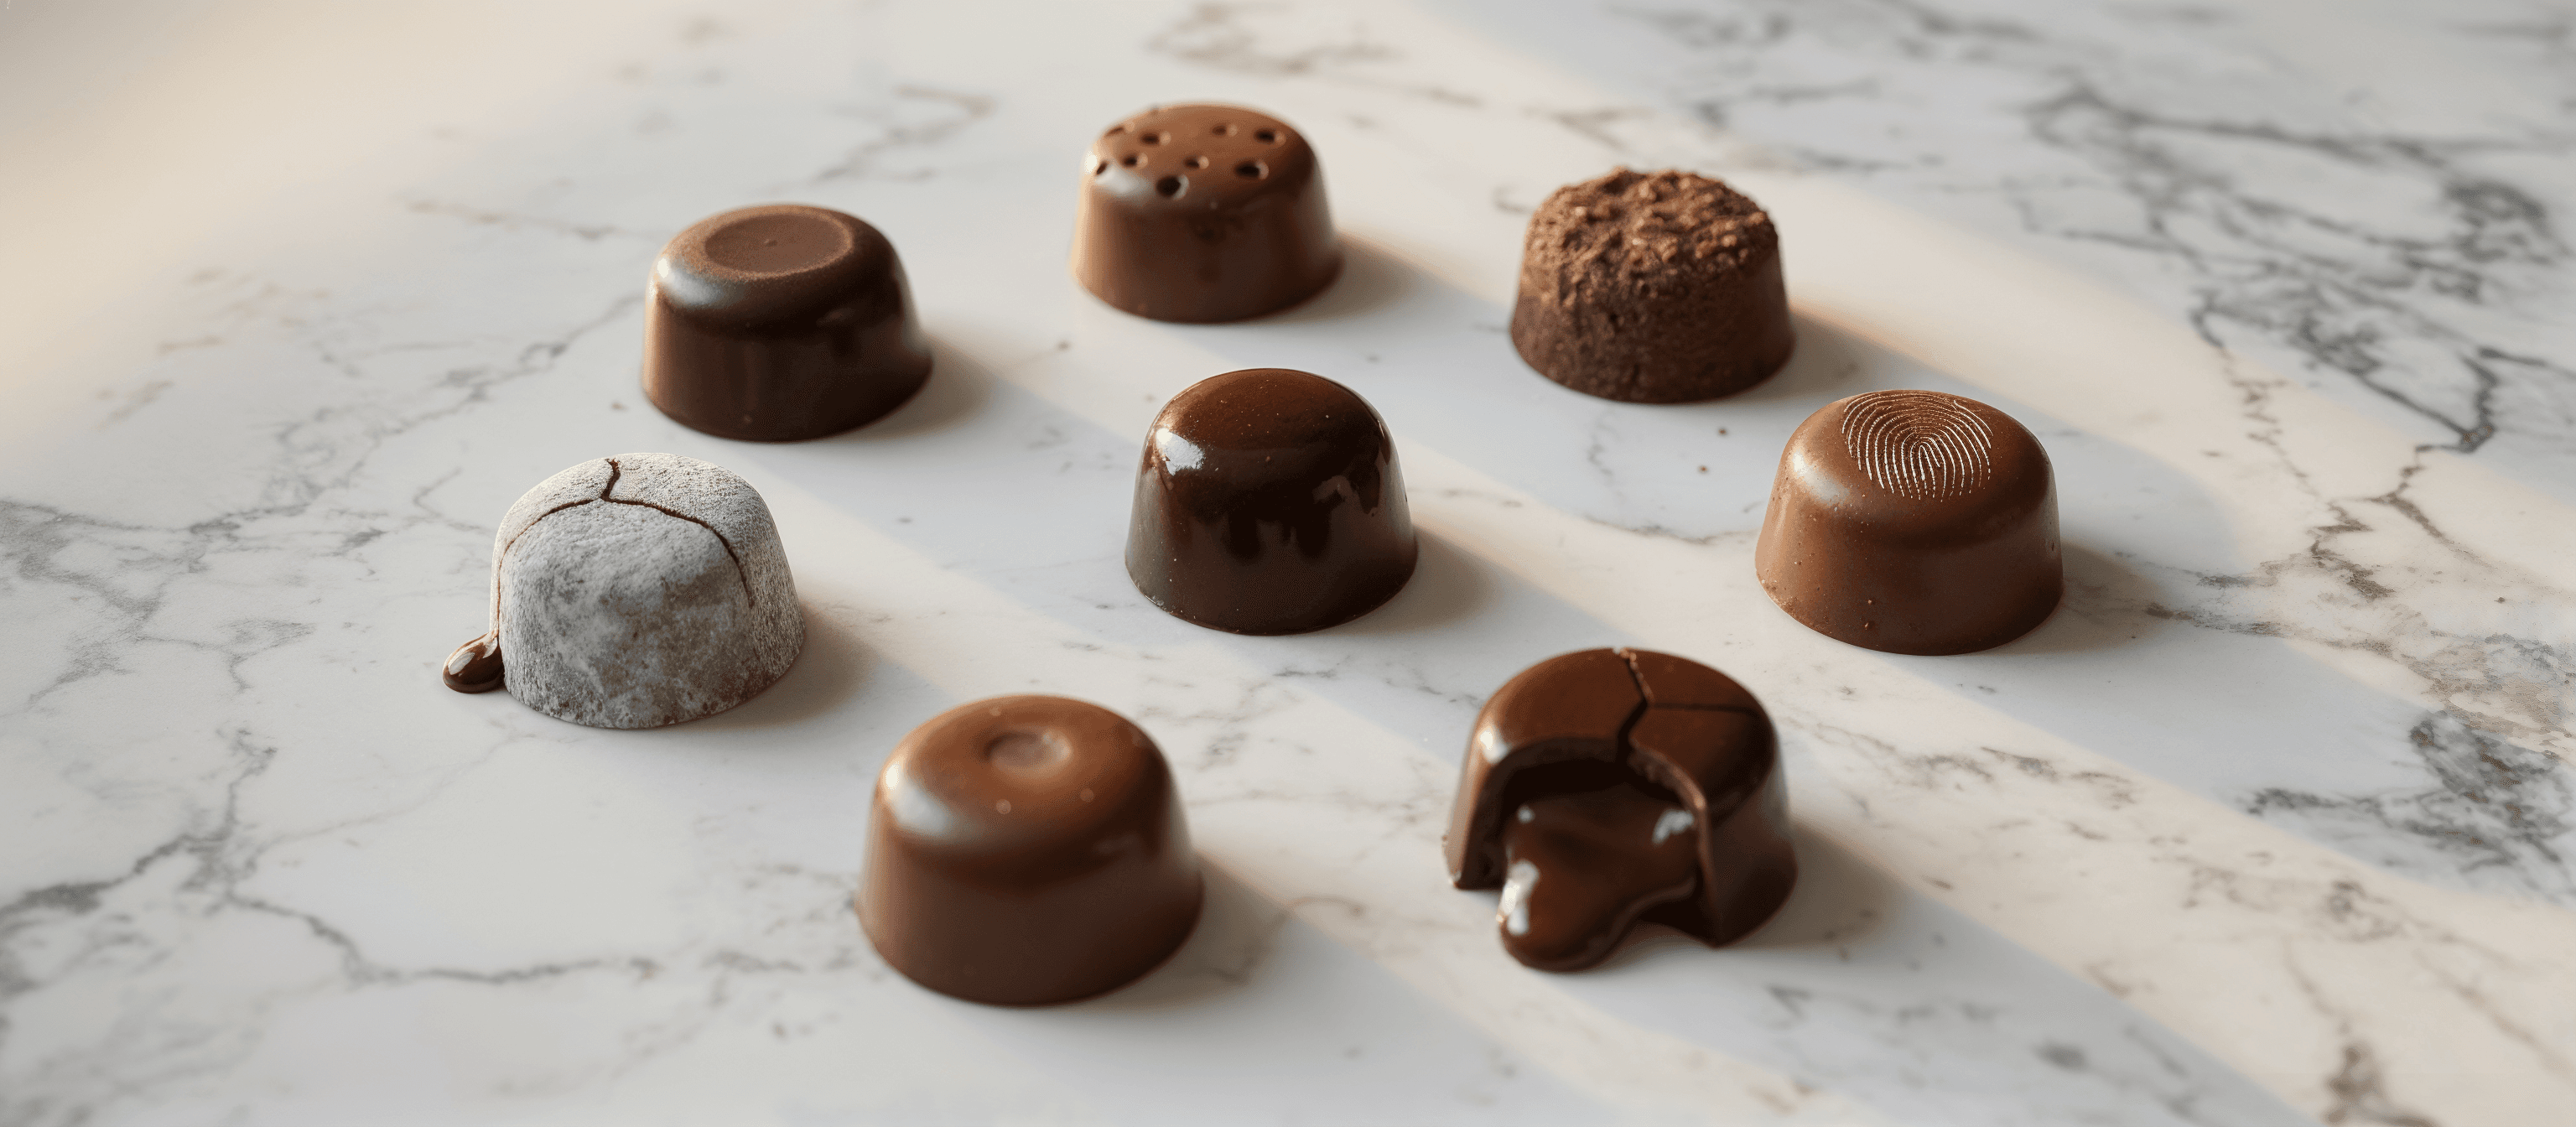
2. Holes in the Chocolate Shell
Holes or voids in the chocolate shell not only compromise the structural integrity of your pralines but also detract from their aesthetic appeal, potentially allowing fillings to leak or air to enter. This common problem often arises during the filling stage and can be mitigated by focusing on chocolate properties and handling methods to ensure a seamless shell.
Causes:
- Selecting chocolate with insufficient fluidity, which fails to flow evenly into all crevices of the mould, leaving gaps.
- Trapping air bubbles within the chocolate during the pouring or filling process, which expand or burst upon setting.
- Tempering issues resulting in chocolate that is either too thick to spread properly or too thin to hold form without holes.
Solutions:
- Choose a chocolate formulation with optimal fluidity tailored for moulding to ensure complete coverage without voids.
- After filling, gently tap or vibrate the moulds on a surface to dislodge and release any trapped air bubbles before the chocolate sets.
- Closely monitor the tempering process to maintain the ideal consistency, avoiding overcrystallization that thickens the chocolate excessively.
3. Chocolates Not Releasing from Moulds
When pralines stubbornly cling to the moulds, it can lead to frustrating demoulding experiences, often resulting in damaged surfaces or broken pieces. This sticking problem is typically linked to preparation and environmental factors, but simple adjustments can promote effortless release and preserve the integrity of your confections.
Causes:
- Inadequate tempering that prevents the chocolate from contracting sufficiently during cooling, keeping it adhered to the mould.
- Using moulds that are dirty, scratched, or worn, providing textured surfaces for the chocolate to grip onto firmly.
- Presence of moisture in the moulds or improper cooling conditions that affect the chocolate's release properties.
Solutions:
- Ensure accurate tempering to allow for natural contraction, facilitating easy separation from the mould upon cooling.
- Regularly clean and polish your moulds to maintain a smooth, pristine surface that doesn't promote sticking.
- After adequate cooling, gently tap the moulds inverted on a soft surface to encourage the pralines to release without force.
4. Fingerprints on Finished Chocolates
Visible fingerprints or smudges on the surface of finished pralines can ruin the polished, professional appearance you're striving for, often occurring during handling or packaging stages. Preventing this requires mindful practices to minimize direct contact and ensure the chocolate is ready for manipulation.
Causes:
- Directly touching the pralines with bare hands, transferring oils and warmth that mar the surface.
- Attempting to handle or package the chocolates before they have fully set and cooled, when the surface is still soft.
Solutions:
- Always wear clean cotton or latex gloves when handling finished pralines to avoid transferring fingerprints or oils.
- Reduce unnecessary contact by using tools like spatulas for transfer, and confirm the chocolates are completely cooled and hardened first.
5. Greyish Discoloration (Bloom)
The appearance of greyish or white streaks, known as bloom, can diminish the visual appeal of your pralines, though it doesn't affect taste or safety. Distinguishing between fat and sugar bloom is key, as each has different causes related to temperature, moisture, and storage, but both can be prevented with proper care.
Causes:
- Fat bloom resulting from temperature fluctuations that cause cocoa butter to migrate to the surface and recrystallize.
- Sugar bloom triggered by exposure to moisture or condensation, dissolving and recrystallizing sugars on the exterior.
- Suboptimal storage conditions involving high humidity, temperature swings, or improper sealing.
Solutions:
- Store pralines in a stable, cool environment around 15–18°C with low humidity to minimize bloom risks.
- Refrain from refrigerating unless absolutely necessary, and if so, use airtight containers; allow gradual acclimation to room temperature before opening.
- Adhere to correct tempering protocols to stabilize the cocoa butter and reduce susceptibility to fat bloom.
6. Cracks in the Chocolate Shell
Cracks in the shell can compromise the praline's structure, leading to potential breakage, leakage of fillings, or an unappealing appearance. This issue often emerges post-moulding and is influenced by ingredient interactions and environmental changes, but reinforcing techniques can help maintain integrity.
Causes:
- Migration of moisture or ethanol from the fillings into the chocolate shell, weakening its structure over time.
- Creating shells that are unevenly distributed or too thin in certain areas, making them prone to cracking.
- Exposing the pralines to rapid temperature variations, causing thermal expansion and contraction stresses.
Solutions:
- Build thicker shells by applying multiple layers or double-coating to provide added strength and resistance to cracking.
- Carefully formulate fillings to limit moisture or alcohol content, or incorporate barrier layers like cocoa butter to prevent migration.
- Employ gradual cooling processes to avoid thermal shock, allowing the chocolate to adjust slowly to temperature changes.
7. Improper Sealing of Moulded Chocolates
Failing to achieve a proper seal on moulded pralines can result in leaks, exposure of fillings, or structural weaknesses, often occurring during the capping stage. Addressing this involves optimizing chocolate properties and filling techniques to ensure a secure, even closure.
Causes:
- Forming shells that are too thin, lacking the substance needed for a robust seal.
- Overfilling the moulds with ganache or other centers, leaving insufficient space for the capping layer.
- Using chocolate that is overly thick or viscous, which doesn't spread evenly for sealing.
Solutions:
- Select chocolate with higher fluidity to facilitate smooth, even sealing without gaps.
- Carefully measure fillings to leave adequate headspace for the chocolate cap to bond properly.
- After adding the cap, scrape away any excess chocolate to create a flat, uniform seal before setting.
Tips for Perfect Moulded Pralines
- Prioritize proper tempering using reliable methods like seeding or the silk technique, and always verify temperatures with a precise thermometer to achieve the best crystal structure for shine and snap.
- Keep moulds impeccably clean and free from scratches or residue, as this is crucial for both achieving a brilliant shine and ensuring easy demoulding without defects.
- Maintain a controlled working environment with temperatures between 18–20°C and low humidity levels to prevent issues like condensation or uneven setting during the process.
- Prepare your fillings in advance by cooling them to room temperature, ensuring they are neither too warm nor too cold to avoid shocking the chocolate shell.
- Steer clear of common pitfalls such as overheating the chocolate, which can destroy its temper, and always store ingredients in cool, dry conditions to preserve quality.
- For cooling, consider a brief refrigeration period if ambient conditions are warm, but take precautions to avoid condensation by using covered trays or allowing gradual temperature adjustment.
Frequently Asked Questions
How can I ensure a shiny finish on my pralines?
To guarantee a lustrous shine, invest in high-quality polycarbonate moulds that are thoroughly cleaned before each use; for added gloss, polish the interiors gently with a microfiber cloth, and pair this with meticulously tempered chocolate to maximize the reflective quality upon demoulding.
What’s the best way to prevent air bubbles in moulded chocolates?
The most effective method is to tap or vibrate the filled moulds lightly on a stable surface immediately after pouring the chocolate, which helps dislodge and expel trapped air before the shell begins to set, ensuring a smooth, bubble-free interior and exterior.
How do I store moulded chocolates to maintain quality?
Store them in a dedicated cool, dry area maintained at 15–18°C, away from direct sunlight, strong odors, and humidity fluctuations; use airtight containers to protect against environmental factors that could induce bloom or flavor alterations.
Why do my pralines crack?
Cracking is frequently caused by the migration of moisture from fillings into the shell, which weakens it over time; to counteract this, construct thicker shells or apply protective barrier layers, and avoid fillings with high liquid content without proper precautions.
What chocolate is best for moulding?
The ideal choice is high-quality couverture chocolate that offers a balanced fluidity for easy moulding and superior taste; steer clear of chocolate chips, as their added stabilizers can hinder proper tempering and result in inferior textures and finishes.